
[the sequence] для iphone и ipad
Думал что 33 и 35 с багом, но потом понял что в меню выбора функций надо на желтую и сиреневую точки телепорта нажать несколько раз….
Anatomy of a replicator in motion

After you add a replicator to a project, the following occurs:
The replicator and its cell (or cells) have separate parameters that control the look of the mosaic pattern you see in the canvas. Changing the replicator parameters modifies the overall onscreen pattern, allowing you to create rectangular, circular, spiral, and other geometric layouts. Changing the cell parameters affects each element in the onscreen pattern, allowing you to modify attributes such as the angle, color, and scale of the pattern pieces.
After replicators are modified, you can save them in the Library for later use. See Save custom replicators in Motion.
Sequence replicator controls in motion
Use the following controls in the Behaviors Inspector to modify the sequence animation:
Parameter: Two pop-up menus (Add and Remove) that designate pattern elements to animate in sequence. When you choose an item from the Add pop-up menu, additional controls appear at the top of the Behaviors Inspector. You can adjust these controls (or keyframe them) to modify the sequence animation, which is based on the change in value between these parameters and the original values of the cells. The Add pop-up menu items include the following options:
Rotation: Adds a rotation dial and value slider to specify (in degrees) the rotation of replicator elements.
Color: Adds a row of color controls to set a tint for replicator elements. Click the color well to choose a color or open the disclosure triangle and adjust the Red, Green, and Blue sliders. For more information about using color controls, see Use basic color controls in Motion.
Opacity: Adds an opacity slider to define the transparency of the pattern elements.
Scale: Adds a scale slider to define the size of replicator elements. Click the disclosure triangle next to the Scale parameter to reveal separate X, Y, and Z scaling subparameters. Use X and Y to resize the width and height of elements separately; use Z to change the depth of 3D text elements. By default, Scale is set to 100%—the size of the replicator cells is equal to the original size defined in the cell parameters.
Position: Adds two value fields that define the offset of elements from their original position in X and Y space. Click the disclosure triangle next to the parameter name to reveal separate X, Y, and Z position subparameters. For example, to create an animation in which elements move upward along the Y axis over the replicator pattern, enter a positive value in the Y Position field. In the following images, Y Position is set to 300.
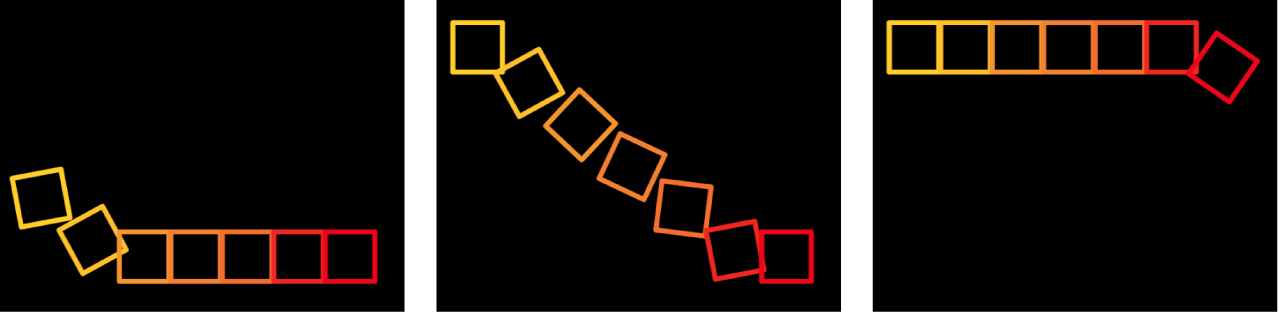
Sequencing: A pop-up menu to set how the sequence animation moves through the elements of the pattern, based on the change from the original parameter value to the value set in the Sequence Replicator parameters. The starting point for the sequence animation is based on the selected Origin or Build Style parameters (in the Replicator Inspector). For example, if a line replicator’s Origin parameter is set to End Point, the sequence animation begins at the end of the line and moves toward the start of the line by default. To change the starting point for the sequence animation, change the Origin or Build Style of the pattern in the Replicator Inspector or HUD. The Sequencing pop-up menu contains the following options:
To: Animation begins at the original value of the cells and moves to the value set in the Sequence Replicator behavior for that parameter. For example, if the original opacity value of a cell is 100%, and opacity is set to 0% in the Sequence Replicator parameters, onscreen elements begin completely opaque and become completely transparent.
From: Animation moves from the value set in the Sequence Replicator behavior to the original value of the cells. For example, if the original opacity value of a cell is 100% and opacity is set to 0% in the Sequence Replicator parameters, onscreen elements begin completely transparent and become completely opaque. This is the opposite of the To option in the Sequencing pop-up menu.
Through: The sequence goes through a full animation cycle starting at the original value of the cells, moving to the value set in the Sequence Replicator, and then returning to the original value of the cells. For example, if the original opacity value of a cell is 100% and opacity is set to 0% in the Sequence Replicator parameters, onscreen elements begin completely opaque, become transparent, and then become completely opaque again.
Through Inverted: The sequence goes through an inverted animation cycle starting from the value set in the Sequence Replicator, moving to the original value of the cells, and then returning to the value set in the Sequence Replicator. For example, if the original opacity value of a cell is 100% and opacity is set to 0% in the Sequence Replicator parameters, the onscreen elements begin completely transparent, become opaque, and then become completely transparent. This is the opposite of the Through Sequencing option.
From Keyframes: Lets you use animation created in the source layer’s parameters (except alpha parameters). Additionally, you can keyframe how the animation moves through the values set in the Sequence Replicator parameters.
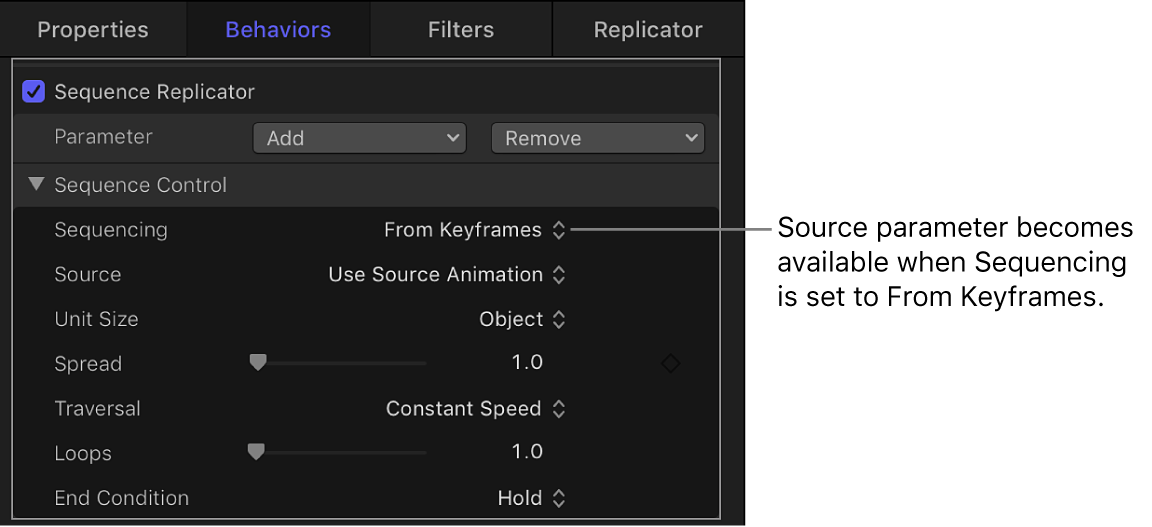
Source: A pop-up menu (available when the Sequencing pop-up menu is set to From Keyframes) to enable animation created by keyframes in a replicated source layer (the layer that’s disabled when the replicator is created). There are two options: Use Source Animation and Ignore Source Animation.
Unit Size: A pop-up menu to specify whether the sequence animation is applied to the replicator pattern as a whole, to its elements, or to a keyframed range. There are three options:
Start: A slider (available when the Unit Size pop-up menu is set to Custom) to specify the offset of the start of the range of elements affected by the sequence animation. In the above image, Start is set to 10%.
End: A slider (available when the Unit Size pop-up menu is set to Custom) to specify the end of the range of elements affected by the sequence animation. By default, End is set to 10%. In the above image, End is set to 30%.
Note: If the Sequencing pop-up menu is set to From Keyframes, the Custom option in the Unit Size parameter has no affect.
Spread: A slider to control the amount of falloff of the animation. To create a softer transition between each element, increase the Spread value.
Traversal: A pop-up menu to set the action of the sequence behavior to one of the following:
Loops: A slider to set the number of times the animation sequences through the replicator pattern over its duration.
Note: Loops is not available when the Traversal parameter is set to Custom.
End Condition: A pop-up menu that sets how the sequence animation is repeated over the duration of the replicator object. This parameter has no effect for Loop values less than or equal to 1. There are three End Condition options:
Hold: Completes the sequence animation cycle one time, then starts it again from the beginning (after the last element in the sequence completes its animation).
Wrap: Treats the sequence animation as a continuous loop so the spread wraps from the last element in the sequence to the first element.
Ping Pong: Completes the sequence animation cycle forward, then completes the animation backward, then forward, and so on.
Using an ipad pro to sequence your synth rig
In this video, synthesist Todd Smith gives an overview of his iPad Pro-based sequencing system.
Smith’s set up is based on an Apple iPad Pro handling mixing and sequencing. Technical details below.
iOS Apps Used:
Gear Used
- Akai XR20
- Korg Microkorg
- Roland Boutque JU-06
- Midi Solutions Quarda Thru
- M-Audio Code 49
- Focusrite Scarlett 18i8
Акустические инструменты и вокал
Самый простой вариант записи акустических инструментов — покупка USB-микрофонов. По каким-то причинам эта связка лучше работает с iPad Pro (2021). Я полагаю, суть в том, что у USB Type-C пропускная способность лучше, чем у Lightning. Да и с питанием у этих «прошек» получше — они даже спокойно заводят взрослые аудиокарты с фантомным питанием!
Клавиши
Это самая простая часть, поскольку о подключении midi-клавиатур известно уже очень давно. Многие музыканты уже много лет подключаются через Camera Connector Kit и играют прямо в GarageBand. Хотя есть много сторонних синтезаторов.
Я, например, нередко использую AudioKit Synth One Synthesizer — он удобен и интуитивно понятен. А также на нём можно нарулить практически любой звук.
Конечно, называть его портативной версией NI Massive будет громковато — слишком уж крутой синтезатор сделала Native Instruments. Однако Synth One — очень крутой волновой синтезатор. Что приятно для новичка, тут очень много предустановленных пресетов, ориентируясь на которые можно сделать крутой звук.
И если для гитаристов выбор железок очень узок и ограничивается разве что разными версиями iRig, то у клавишников тут целое раздолье: и AKAI, и IK Multimedia, и CME, и Korg, и некоторые Arturia, и Nektar, и Roli.
Мне особенно интересны последние клавиши. Они подключаются к айпэду по Bluetooth. У них есть собственное приложение. Но ключевое в этих клавишах не это. Главное — музыкальная артикуляция:
Клавиши реагируют на силу нажатия, а также на движение пальцев по вертикали и горизонтали на самой клавиатуре. Из-за этого звук обретает новую жизнь и дыхание. По сути, Roli сделала новый инструмент, прародителем которого стала midi-клавиатура.
Однако те, кто пробовал Roli, в один голос говорят, что играть на устройстве очень сложно. Даже в одном проморолике, который, кажется, уже удалили, музыкант слажал. Но трудности понятны с первого взгляда: музыканту нужно сразу обращать внимание на очень много факторов. Зато как всё это звучит!
Но не всем такое по нраву. В случайной беседе я узнал, что Арсений Петров, известный как Diamagnetic, тоже музыкант. Он играет на клавишах, гитаре и ударных, а также поёт. И он сказал, что Roli — чушь, а вот молоточковый механизм его midi-клавиатуры — самое оно. Правда, на мой вопрос, как сделать на молоточках вибрато, он не нашёл ответа.
Однако у Арсения есть свой кейс. Он также подключает M-Audio Oxygen 88 к iPad Pro (2021). Говорит, с появлением планшета заниматься музыкой он стал гораздо чаще.

Причина проста: клавиатура находится в спальне, а макбук в рабочем кабинете. При этом к компьютеру подключено много проводов, которые надо постоянно отключать, а затем подключать снова. А вот iPad просто поднял, отнёс в спальню, подключил — и давай играть в GarageBand.
Но если вам нужно что-то попроще Roli или просто клавиатуры по каким-то причинам слишком мало, то и для таких взыскательных особ есть кое-что! Я, например, присматриваюсь к iRig Keys I/O — это одновременно и midi-клавиатура, и аудиоинтерфейс:
Электрогитара или бас
Далеко ходить не будем. Первым героем стал тот самый Виктор Кучер, с которого всё и началось. Я позвал его к нам в студию, чтобы он показал свой стафф.
Начав с чашечки кофе и обсуждения любимых песен Foo Fighters (Вить, как же я завидую, что ты-таки попал на их концерт) и любимых музыкальных плагинов, мы переместились в съёмочную, где он расчехлил свой дорогущий «Страт», сделанный на заказ в Nashguitars, и iPad Pro (2021).
Также Витя взял с собой iRig HD 2 — то самое связующее звено между планшетом и гитарой. Это портативная аудиокарта, разработанная для гитаристов и басистов, которые играют в устройства с iOS и iPadOS. Есть версия и на Android, кстати.


