
- Adapting to changes in context
- Auto layout
- Device screen sizes and orientations
- Device size classes
- How to delete an app that has a configuration profile on your iphone, ipad, or ipod touch
- If you’re switching to a new device
- Ipad and iphone configuration setting | sap blogs
- Layout guides and safe areas
- Multitasking size classes
- Set up face id or touch id and create a passcode
- Size classes
- Turn on your device
- Вопросы и ответы
- Корпоративные программы управления устройством в ios
- Установка профиля для прошивки или обновления ios
Adapting to changes in context
Maintain focus on the current content during context changes. Content is your highest priority. Changing focus when the environment changes can be disorienting and frustrating, and can make people feel like they’ve lost control of the app.
Avoid gratuitous layout changes. When someone rotates a device, the entire layout doesn’t have to change. For example, if your app shows a grid of images in portrait mode, it doesn’t have to present the same images as a list in landscape mode. Instead, it might simply adjust the dimensions of the grid. Try to maintain a comparable experience in all contexts.
Auto layout
Auto Layout is a development tool for constructing adaptive interfaces. Using Auto Layout, you can define rules (known as constraints) that govern the content in your app. For example, you can constrain a button so it’s always horizontally centered and positioned eight points below an image, regardless of the available screen space.
Auto Layout automatically readjusts layouts according to the constraints you specify for certain environmental variations, known as traits. You can set your app to dynamically adapt to a wide range of traits, including:
For developer guidance, see NSLayoutConstraint and UITraitCollection.
Device screen sizes and orientations
iOS devices have a variety of screen sizes and people can use them in either portrait or landscape orientation. In edge-to-edge devices like iPhone X and iPad Pro, the display has rounded corners that closely match the device’s overall dimensions. Other devices — such as iPhone SE and iPad Air — have a rectangular display.
If your app runs on a specific device, make sure it runs on every screen size for that device. In other words, an iPhone-only app must run on every iPhone screen size and an iPad-only app must run on every iPad screen size.
NOTE All scale factors in the table above are UIKit scale factors, which may differ from native scale factors. For developer guidance, see scale and nativeScale.
To learn how screen resolution impacts your app’s artwork, see Image Size and Resolution.
Device size classes
Different size class combinations apply to the full-screen experience on different devices, based on screen size.
| Device | Portrait orientation | Landscape orientation |
|---|---|---|
| 12.9″ iPad Pro | Regular width, regular height | Regular width, regular height |
| 11″ iPad Pro | Regular width, regular height | Regular width, regular height |
| 10.5″ iPad Pro | Regular width, regular height | Regular width, regular height |
| 9.7″ iPad | Regular width, regular height | Regular width, regular height |
| 7.9″ iPad mini | Regular width, regular height | Regular width, regular height |
| iPhone 12 Pro Max | Compact width, regular height | Regular width, compact height |
| iPhone 12 Pro | Compact width, regular height | Compact width, compact height |
| iPhone 12 | Compact width, regular height | Compact width, compact height |
| iPhone 12 mini | Compact width, regular height | Compact width, compact height |
| iPhone 11 Pro Max | Compact width, regular height | Regular width, compact height |
| iPhone 11 Pro | Compact width, regular height | Compact width, compact height |
| iPhone 11 | Compact width, regular height | Regular width, compact height |
| iPhone XS Max | Compact width, regular height | Regular width, compact height |
| iPhone XS | Compact width, regular height | Compact width, compact height |
| iPhone XR | Compact width, regular height | Regular width, compact height |
| iPhone X | Compact width, regular height | Compact width, compact height |
| iPhone 8 Plus | Compact width, regular height | Regular width, compact height |
| iPhone 8 | Compact width, regular height | Compact width, compact height |
| iPhone 7 Plus | Compact width, regular height | Regular width, compact height |
| iPhone 7 | Compact width, regular height | Compact width, compact height |
| iPhone 6s Plus | Compact width, regular height | Regular width, compact height |
| iPhone 6s | Compact width, regular height | Compact width, compact height |
| iPhone SE | Compact width, regular height | Compact width, compact height |
| iPod touch 5th generation and later | Compact width, regular height | Compact width, compact height |
How to delete an app that has a configuration profile on your iphone, ipad, or ipod touch
Learn how to remove an app and its configuration profile.
Information about products not manufactured by Apple, or independent websites not controlled or tested by Apple, is provided without recommendation or endorsement. Apple assumes no responsibility with regard to the selection, performance, or use of third-party websites or products. Apple makes no representations regarding third-party website accuracy or reliability. Contact the vendor for additional information.
If you’re switching to a new device
If you want to transfer your information from another device to your new iPhone, iPad, or iPod touch, follow these steps:
Make sure that you back up your previous iOS device so that you can transfer the content to the new device.
Ipad and iphone configuration setting | sap blogs
[Note by Peter Hartwich on August 4th, 2021: Dear readers, please note that information in this blog is now up to three years old. Some comments might still be up to date and useful, others not, or contexts from recent releases are missing. Please check out and follow the current and official documentation accompanies the software. In addition, I can only recommend searching for SAP notes first.]
[Note by Peter Hartwich on June 9th, 2021: Blog Closed now (Existing comments will be displayed, new comments are not allowed)]
Afterstrugglinga few days toactivate the connection from iPADon SAPBusiness Onethrough the Integration Service, I writethis little “HOW TO” with fullconfiguration of various elements, hoping it might helpsomeonein the future.
Our situation:
=> Sap Business One 8.82 PL 05
=> MSSQL 2005 without istance name
=> MSSQL port 1433
=> Sap Business One IPAD app version 1.6.0
Well… first of all.. It seemsthat the iPAD connectiondoes not workon port 8080.For us,it was necessary touse port8443 (https). Theappworks correctlyon that porteven withouta certificate.
So….
- INTEGRATION FRAMEWORK SETTINGS
- Open the Integration Framework (from SAP Administration => Integration Service => Integration Administration). Login with userid B1iadmin and the correct password.
- Check, under the SLD (System Landscape Directory), the right configuration of WSforMobile under B1i SErver. I set this environment like:
- WSAN
- WSAS
- WSAO
- WSAR
- associatedSrvIP => SAP B1 SERVER NAME
- I left all the rest empty. If test connection (WSAN and WSAS) return Success Message, you are right.
- Check what port number you are running on. From the integration framework, goto Maintenance => CfgRuntime. Here you can see the port setting for
- Then… from integration Framework, goto Scenarios => Authentication. In the select box User Def. Author. Identifier, select sap.B1Mobile. Be sure that in Enforce Secure Transport => True
- Open the Integration Framework (from SAP Administration => Integration Service => Integration Administration). Login with userid B1iadmin and the correct password.
- SAP BUSINESS ONE CONFIGURATION
- Ok.. Now we can check some settings inside SAP BUSINESS ONE Application. From Administration => Setup => General => Users select the users who requires acces through IPAD and :
- IPAD APP CONFIGURATION (inside your LAN )
- we must configure the iPad app in the right way. I do it in this way:
Ok.. with this settings, we are able to connect from iPAD App.
If you need to connect with your iPAD from outside your LAN, weel you need to configure your LAN (firewall, router or other) to achieve your goal.
Following, what i do in my LAN architecture…
We have a domain name registerd with register.it, and we have some PUBLIC STATIC IP from our Internet Service Provider (ISP). So, i created in register DNS a record (type A) like ipadb1.ourdomain.com => A => our PUBLIC STATIC IP (Eg: 80.20.10.50)
In iPad app configuration, i change the Server from SAP_BUSINESS_ONE_SERVER_IP_ADDRESS:8443 to ipadb1.ourdomain.com:8443.
Then i create a firewall rules to nat all incoming traffic from 80.20.10.50:8443 to our SAP_BUSINESS_ONE_SERVER_IP_ADDRESS:8443.
The rules in IPTABLES is like:
ipatles -t nat -A PREROUTING -p tcp -m tcp -d 80.20.10.20 –dport 8443 -j DNAT –to-destination SAP_BUSINESS_ONE_SERVER_IP_ADDRESS:8443..
And that’s all….
TheiPadconnects tosapboth within ourLANor viathesim card,or viawireless connectionsoutside ourlan.
I hopethat this smallandsimple guidecan help someonein the configuration,saving time andsome…. time.
Sorry for my english.. I know it’s not good…
Layout guides and safe areas
A layout guide defines a rectangular region that helps you position, align, and space your content on the screen. The system includes predefined layout guides that make it easy to apply standard margins around content and restrict the width of text for optimal readability. You can also define custom layout guides.
A safe area defines the area within a view that isn’t covered by a navigation bar, tab bar, toolbar, or other views a view controller might provide.
iOS 15 and later defines a keyboard layout guide that represents the space the keyboard currently occupies and accounts for safe area insets. Using this guide can help you make the keyboard feel like an integral part of your app, regardless of the type of keyboard people use or where they position it. For developer guidance, see UIKeyboardLayoutGuide.
Adhere to the system-defined safe areas and layout margins. These layout guides ensure appropriate insetting based on the device and context. The safe area also prevents content from underlapping the status bar, navigation bar, toolbar, and tab bar. Standard system-provided views automatically adopt a safe area layout guide.
For developer guidance, see Positioning Content Relative to the Safe Area and Positioning Content Within Layout Margins.
Multitasking size classes
On iPad, size classes also apply when your app runs in a multitasking configuration.
| Device | Mode | Portrait orientation | Landscape orientation |
|---|---|---|---|
| 12.9″ iPad Pro | 2/3 split view | Compact width, regular height | Regular width, regular height |
| 1/2 split view | N/A | Regular width, regular height | |
| 1/3 split view | Compact width, regular height | Compact width, regular height | |
| 11″ iPad Pro | 2/3 split view | Compact width, regular height | Regular width, regular height |
| 1/2 split view | N/A | Compact width, regular height | |
| 1/3 split view | Compact width, regular height | Compact width, regular height | |
| 10.5″ iPad Pro | 2/3 split view | Compact width, regular height | Regular width, regular height |
| 1/2 split view | N/A | Compact width, regular height | |
| 1/3 split view | Compact width, regular height | Compact width, regular height | |
| 9.7″ iPad | 2/3 split view | Compact width, regular height | Regular width, regular height |
| 1/2 split view | N/A | Compact width, regular height | |
| 1/3 split view | Compact width, regular height | Compact width, regular height | |
| 7.9″ iPad mini 4 | 2/3 split view | Compact width, regular height | Regular width, regular height |
| 1/2 split view | N/A | Compact width, regular height | |
| 1/3 split view | Compact width, regular height | Compact width, regular height |
Ensure that primary content is clear at its default size. People shouldn’t have to scroll horizontally to read important text, or zoom to see primary images, unless they choose to change the size.
Maintain an overall consistent appearance throughout your app. In general, elements with similar functions should look similar.
Use visual weight and balance to convey importance. Large items catch the eye and appear more important than smaller ones. Larger items are also easier to tap, which is especially important when an app is used in distracting surroundings, such as in the kitchen or a gym. In general, place principal items in the upper half of the screen, near the leading side.
Use alignment to ease scanning and to communicate organization and hierarchy. Alignment makes an app look neat and organized, helps people focus while scrolling, and makes it easier to find information. Indentation and alignment can also indicate how groups of content are related.
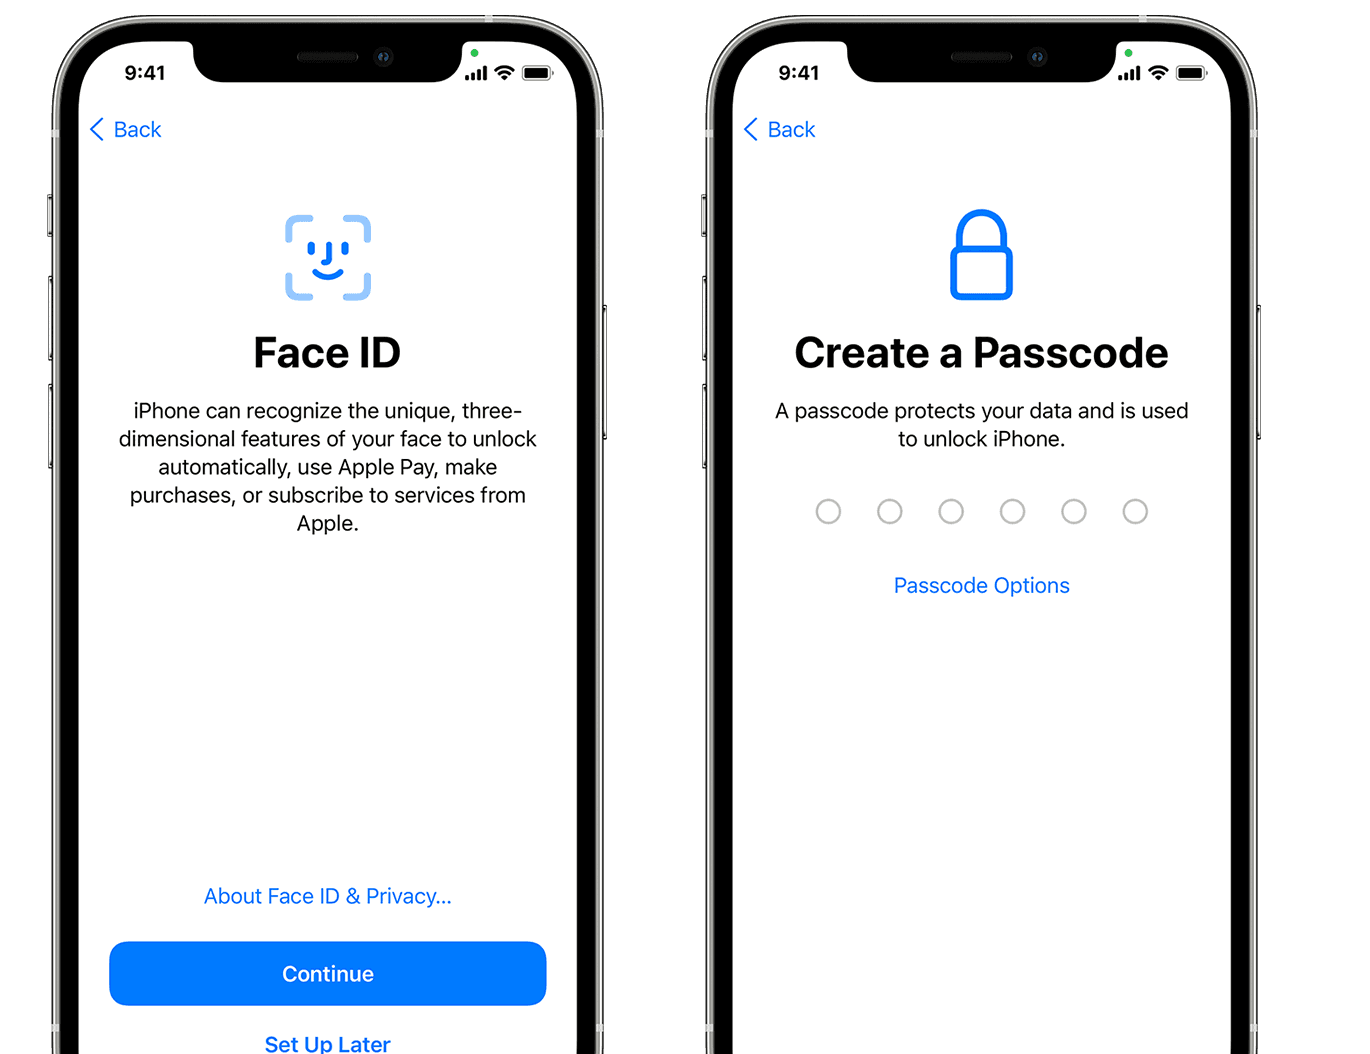
Set up face id or touch id and create a passcode
On some devices, you can set up Face ID or Touch ID. With these features, you can use face recognition or your fingerprint to unlock your device and make purchases. Tap Continue and follow the instructions, or tap «Set Up Later in Settings.»
Next, set a six-digit passcode to help protect your data. You need a passcode to use features like Face ID, Touch ID, and Apple Pay. If you’d like a four-digit passcode, custom passcode, or no passcode, tap «Passcode Options.»
Size classes
Size classes are traits that are automatically assigned to content areas based on their size. The system defines two size classes, regular (denotes expansive space) and compact (denotes constrained space), which describe the height and width of a view.
A view may possess any combination of size classes:
As with other environmental variations, iOS dynamically makes layout adjustments based on the size classes of a content area. For example, when the vertical size class changes from compact height to regular height — such as when the device rotates from landscape to portrait orientation — tab bars may become taller.
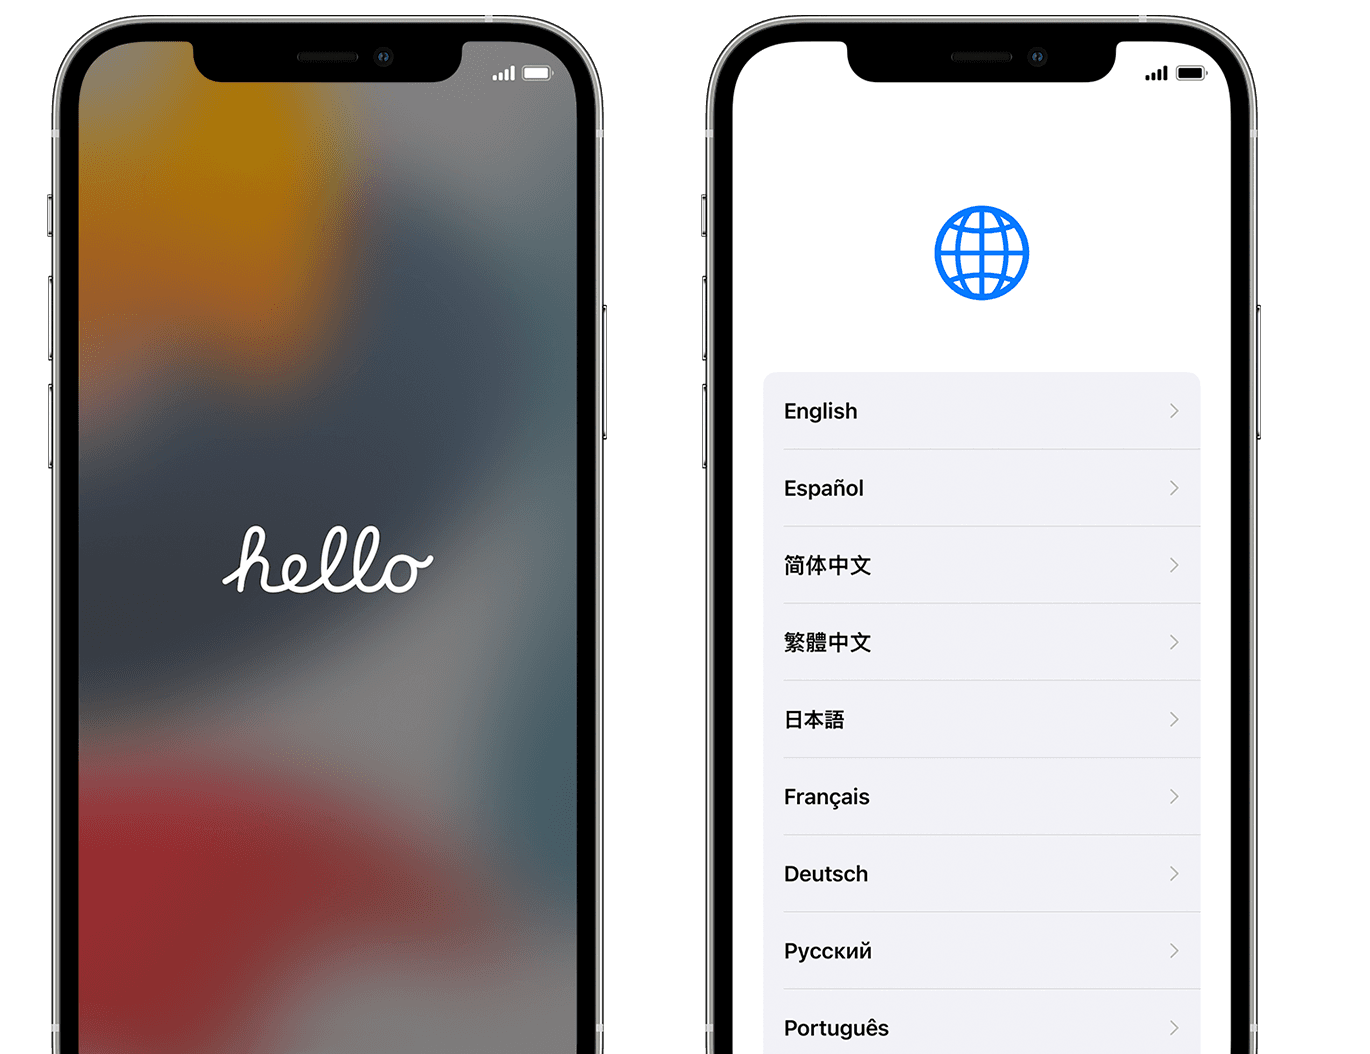
Turn on your device
Press and hold the device’s power button until you see the Apple logo. You’ll then see «Hello» in many languages. Follow the steps to get started. If you’re blind or have low vision, you can turn on VoiceOver or Zoom from the Hello screen.
When asked, choose your language. Then tap your country or region. This affects how information looks on your device, including date, time, contacts, and more. At this point, you can tap the blue accessibility button to set up Accessibility Options that can optimize your setup experience and the use of your new device.
Get help if your iPhone, iPad, or iPod touch won’t turn on, or if your device is disabled or requires a passcode.
Вопросы и ответы
Так как установка профилей не сильно распространенная «фишка», то имеет смысл рассмотреть несколько самых распространенных вопросов, касающихся этой темы.
Итак, вот дополнительная (и полезная!) информация:
- Можно ли удалить профиль? Конечно же, да. Открываете «Настройки — Основные — Управление устройством», выбираете нужный и удаляете.
- Это опасно? Несмотря на то, что вся процедура называется «Управление устройством», никаких «посторонних движений» с вашим iPhone и iPad происходить не должно. А если они и будут, то только в рамках той программы, для которой все это и предназначалось. Но в любом случае, помните — ко всему нужно подходить «с умом».
- Можно ли установить профиль через iTunes? Мне о таких способах не известно. Да и зачем это делать — ведь для всех манипуляций достаточно только гаджета.
Корпоративные программы управления устройством в ios
Сторонние приложения (которые по каким-то причинам не попали в App Store), для своей корректной работы могут требовать установку корпоративных программ управления устройством. По сути, это те же самые профили, только предназначенные для одного конкретного приложения. Как их активировать?
- Вы скачиваете приложение.
- При его открытии видите надпись: «Ненадежный корпоративный разработчик».

- Переходите в «Настройки — Основные — Управление устройством».
- В графе «Корпоративные программы» появляется новый профиль.

- Открываем его и жмем доверять.

Все, приложение можно запускать.
Установка профиля для прошивки или обновления ios
Пригодится в том случае, если вы хотите испытать новую версию программного обеспечения до его официального релиза.


